


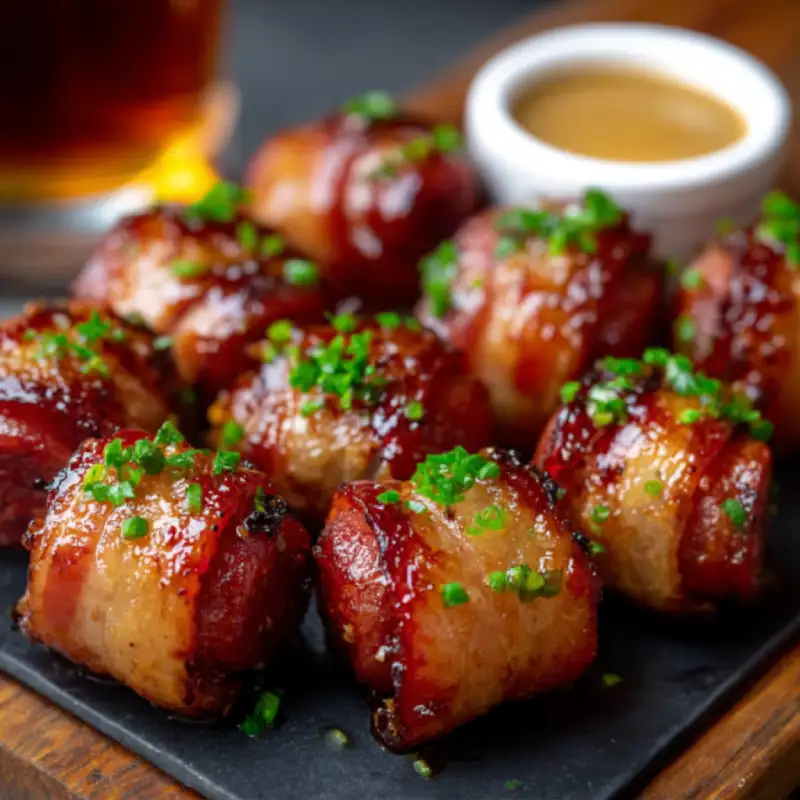
Introduction: Your New Go-To Appetizer
Imagine a symphony of flavors and textures hitting your palate: the crisp, salty embrace of perfectly cooked bacon, yielding to the tender, savory bite of smoky kielbasa, all coated in a sticky, sweet, and tangy glaze. That, my friends, is exactly what you get with these incredible bite-sized bacon-wrapped kielbasa snacks. They are an absolute game-changer for any gathering, from casual game nights to elegant holiday parties. Seriously, once you try these, you’ll wonder how you ever hosted without them! For more delicious appetizer ideas and easy recipes, See more good recipes here.
Why You’ll Love These Bacon-Wrapped Kielbasa Bites? Because they’re the ultimate crowd-pleaser! They disappear faster than you can say ‘appetizer,’ and guests will be begging you for the recipe. This isn’t just a snack; it’s an experience. It’s my favorite party trick, and honestly, it’s not even a trick—it’s just pure, unadulterated deliciousness that everyone raves about!
How This Recipe Works: The Perfect Bite
This recipe is a masterpiece of balance and simplicity, meticulously designed to deliver maximum flavor with minimal effort. It’s all about creating the “perfect bite†every single time.
- Crispy Bacon, Tender Kielbasa: The magic starts with the contrast. As the bacon renders and crisps, it infuses the kielbasa with its irresistible smoky flavor, while the kielbasa remains wonderfully tender on the inside. You get that satisfying crunch followed by a succulent chew.
- Sweet, Savory, and Tangy Glaze: The secret weapon here is our incredibly versatile glaze. It’s perfectly balanced—sweet from brown sugar or maple syrup, deeply savory with a hint of spice, and brightened by a touch of acidity. This glaze caramelizes beautifully in the oven, creating a sticky, irresistible coating that truly elevates these bites.
- Effortless Assembly, Big Flavor Impact: Don’t let the gourmet taste fool you; these are remarkably simple to put together. A little chopping, a quick whisk for the glaze, a bit of wrapping, and into the oven they go. The flavor impact, however, is anything but simple—it’s bold, complex, and utterly addictive.
- No Frying Required: Baked to Perfection: One of the best parts about this recipe is that it’s baked! No messy frying, no splattering oil. Baking ensures even cooking, consistent crispiness, and an easier cleanup, making these ideal for stress-free entertaining.
Ingredients and Substitutions: The Building Blocks of Flavor
Here is what you need and why:
Kielbasa: Choosing the Right Sausage: For these bite-sized bacon-wrapped kielbasa snacks, I highly recommend using a high-quality, pre-cooked smoked kielbasa. Look for beef or pork varieties, or a blend of both. A good quality kielbasa will have a rich, smoky flavor that stands up beautifully to the bacon and glaze. Avoid fresh kielbasa that requires longer cooking; we want something that just needs to be heated through and browned. My personal preference is a Polish-style kielbasa for its authentic flavor profile.
Bacon: Thickness Matters for Crispiness: This is a crucial element! For optimal crispiness and to ensure it cooks through at the same rate as the kielbasa, I recommend a medium-cut bacon. Thin-cut bacon can become overly brittle and burn before the kielbasa is heated, while thick-cut can be too chewy and might not crisp up enough unless par-cooked first. Applewood smoked bacon adds an extra layer of deliciousness!
Sweetener: Brown Sugar or Maple Syrup (Flavor Notes): The glaze needs sweetness to balance the savory bacon and kielbasa. Light brown sugar is my go-to for its subtle molasses notes and moist texture, which helps create a beautiful caramelization. You can also use pure maple syrup (not pancake syrup!) for a richer, more complex sweetness and a hint of earthy flavor. Either choice provides that irresistible sticky coating.
Acidity: Apple Cider Vinegar or Balsamic (Balancing the Sweetness): A touch of acidity is essential to cut through the richness and sweetness, preventing the glaze from becoming cloyingly sweet. Apple cider vinegar offers a bright, fruity tang, while balsamic vinegar provides a deeper, slightly more sophisticated and rounded tartness. Both work wonderfully, so choose based on your preference or what you have on hand.
Spices: A Touch of Heat (Optional Chili Flakes): To add an extra dimension and a subtle kick, I love incorporating a pinch of red chili flakes into the glaze. It’s entirely optional, but it truly elevates the flavor profile without making the dish overtly spicy. A dash of black pepper and maybe a hint of garlic powder also wouldn’t go amiss to enhance the savory notes. For fantastic glaze ideas, check out this guide on Food Network’s Best Bacon Glazes.
Step-by-Step Instructions: From Prep to Platter
Follow these simple steps for perfectly baked bite-sized bacon-wrapped kielbasa snacks:
1. Prepping Your Kielbasa and Bacon
First, take your kielbasa and slice it into 1/2 to 3/4-inch thick rounds. Aim for pieces that aren’t too thin (they’ll dry out) or too thick (they’ll be harder to wrap and eat). Next, lay out your bacon strips. If you’re using standard slices, cut each strip in half crosswise. If your kielbasa rounds are smaller, you might even cut bacon into thirds. The goal is for each bacon piece to be just long enough to comfortably wrap around a kielbasa slice with a slight overlap.
2. Making the Simple Glaze
In a small saucepan over medium heat, combine your brown sugar (or maple syrup), apple cider vinegar (or balsamic), and any optional spices like chili flakes or garlic powder. Whisk constantly until the sugar is fully dissolved and the mixture comes to a gentle simmer. Let it cook for just a minute or two until it slightly thickens, then remove it from the heat. This glaze is your secret weapon for that irresistible sticky, sweet, and tangy coating.
3. Wrapping and Arranging: The Art of the Pinwheel
Take one kielbasa slice and wrap a piece of bacon snugly around its circumference. If necessary, secure the bacon with a toothpick (though often the bacon will stick to itself as it cooks). Arrange the wrapped kielbasa pieces seam-side down on a foil-lined baking sheet fitted with a wire rack. Make sure to leave a little space between each piece to allow for even crisping. The wire rack is key here for preventing soggy bottoms!
4. Baking for Optimal Crispiness and Cook Through
Preheat your oven to 375°F (190°C). Place the baking sheet with the bacon-wrapped kielbasa into the preheated oven. Bake for 20-25 minutes, or until the bacon is starting to get crispy and the kielbasa is heated through. Halfway through the baking time, you can flip the pieces to ensure even browning, though with a wire rack, it’s often not strictly necessary. Keep an eye on them to prevent burning.
5. Finishing Touches: Glaze and Serve
Once the bacon is nice and crispy, remove the baking sheet from the oven. Carefully brush each bacon-wrapped kielbasa with your prepared glaze. You can brush them once on the baking sheet and then, for extra stickiness and caramelization, return them to the oven for another 5-10 minutes, or until the glaze is bubbling and slightly caramelized. Immediately transfer the glazed bite-sized bacon-wrapped kielbasa snacks to a serving platter. If you used toothpicks, be sure to leave them in for easy serving!
Expert Tips for Success: Guaranteeing Perfect Bites
- Don’t Overcrowd the Pan: Give each kielbasa bite its space on the baking sheet. Overcrowding leads to steaming instead of crisping, resulting in soggy bacon. Use two baking sheets if necessary.
- Secure with Toothpicks (If Needed): While some bacon will naturally stick, a trusty wooden toothpick guarantees each bite stays perfectly wrapped. Just remember to remove them or instruct guests to watch out for them before serving!
- The Importance of a Cooling Rack: Baking on a wire rack set over a foil-lined baking sheet is crucial. It allows air to circulate all around the bacon-wrapped kielbasa, ensuring even crisping and preventing the bottoms from getting greasy and soft.
- Adjust Baking Time for Bacon Crispness: Bacon crispiness is a personal preference. Start with the suggested baking time, then add a few more minutes if you prefer your bacon extra crispy. Just watch carefully to avoid burning!
- Check Internal Temperature for Doneness: Although kielbasa is pre-cooked, ensure it’s heated through to at least 145°F (63°C). A quick check with an instant-read thermometer will give you peace of mind, especially if preparing for a crowd.
What to Serve With Your Kielbasa Bites
These bite-sized bacon-wrapped kielbasa snacks are fantastic on their own, but they also play well with others! Here are some ideas to make your spread even more irresistible:
Dipping Sauces: Spicy Mustard or Ranch
For an extra burst of flavor, consider offering a couple of dipping sauces. A grainy, spicy brown mustard or a classic Dijon provides a piquant contrast to the sweet and savory bites. For those who prefer something milder, a creamy ranch dressing or even a honey mustard would be a delightful pairing.
Other Appetizer Pairings
To create a balanced appetizer spread, consider pairing these rich, savory bites with lighter options. A fresh fruit platter, a vibrant veggie crudité with hummus, or some crisp bruschetta would offer a refreshing contrast. Mini quiches or stuffed mushrooms also make excellent companions, rounding out the selection.
As Part of a Brunch Spread
Don’t just relegate these to evening parties! They are absolutely phenomenal as part of a hearty brunch spread. Imagine them alongside fluffy scrambled eggs, crispy hash browns, and perhaps some mini pancakes or waffles. The sweet and savory nature of the bacon-wrapped kielbasa makes them a perfect fit for a decadent brunch.
Storing and Reheating: Enjoying Leftovers
While these bite-sized bacon-wrapped kielbasa snacks are best enjoyed fresh out of the oven, leftovers (if you’re lucky enough to have them!) can be stored and reheated.
Refrigerator Storage Guidelines
Allow any leftover kielbasa bites to cool completely to room temperature. Transfer them to an airtight container and store them in the refrigerator for up to 3-4 days. It’s best to place a paper towel at the bottom of the container to absorb any excess moisture and help prevent them from getting soggy.
Best Way to Reheat for Crispiness
To bring back that delightful crispiness, reheating in an oven or air fryer is your best bet. Preheat your oven to 350°F (175°C) and arrange the bites in a single layer on a baking sheet. Reheat for 10-15 minutes, or until heated through and the bacon crisps up again. In an air fryer, set it to 350°F (175°C) and cook for 5-7 minutes, shaking the basket halfway through. Avoid reheating in the microwave, as it will make the bacon rubbery and won’t get them crispy.
Freezing Instructions
Yes, you can freeze these! Flash freeze the cooked and cooled kielbasa bites on a baking sheet until solid (about 1-2 hours). Once frozen, transfer them to a freezer-safe bag or airtight container. They can be frozen for up to 1-2 months. When ready to enjoy, thaw them overnight in the refrigerator and then reheat using the oven or air fryer method for best results. You might need to add a few extra minutes to the reheating time if starting from frozen or partially thawed.
Frequently Asked Questions About Bacon-Wrapped Kielbasa
Can I use turkey bacon?
What if my bacon isn’t crispy?
Can I assemble these ahead of time?
Is there a dairy-free option for the glaze?
How spicy can I make them?
Bite-Sized Bacon-Wrapped Kielbasa Snacks
- Total Time: 45 minutes
- Yield: 12-15 servings 1x
Description
These irresistibly delicious bite-sized bacon-wrapped kielbasa snacks are coated in a sweet, savory, and tangy glaze. Perfect for parties, they’re easy to bake and guaranteed to be a crowd-pleaser.
Ingredients
- 1 (13-14 ounce) package smoked kielbasa, pre-cooked
- 12–16 slices medium-cut bacon
- 1/2 cup light brown sugar, packed (or pure maple syrup)
- 2 tablespoons apple cider vinegar (or balsamic vinegar)
- 1/2 teaspoon red chili flakes (optional, for heat)
- Wooden toothpicks (optional)
Instructions
- Preheat oven to 375°F (190°C). Line a large baking sheet with foil and set a wire rack on top.
- Slice kielbasa into 1/2 to 3/4-inch thick rounds. Cut each bacon slice in half crosswise.
- In a small saucepan, combine brown sugar (or maple syrup), apple cider vinegar (or balsamic), and chili flakes (if using). Whisk over medium heat until sugar dissolves and mixture simmers, about 1-2 minutes. Remove from heat.
- Wrap each kielbasa slice with a piece of bacon, securing with a toothpick if needed. Arrange seam-side down on the prepared wire rack, leaving space between each.
- Bake for 20-25 minutes, or until bacon begins to crisp and kielbasa is heated through.
- Remove from oven and brush each bacon-wrapped kielbasa generously with the prepared glaze.
- Return to oven and bake for another 5-10 minutes, or until glaze is bubbly and caramelized.
- Transfer to a serving platter and serve hot.
- Prep Time: 15 mins
- Cook Time: 30 mins